
A day in the life of a longarm quilter.
Most days go smoothly, and something like this at my APQS Millie longarm machine. Measure quilt top, backing, and batting. Attach quilt backing and quilt top to their leaders. Layer the batting on the backing and baste at the top to hold it down and give a straight line for basting the quilt top. Select the thread and stitch design. Wind bobbins. Change the needle and thread the machine. Baste the top edge of the quilt top. Using a scrap of fabric in the backing’s side “margin”, test and adjust the machine’s stitch tension. Set up the computerized design and begin sewing.
Then there is the rare day when I mutter several times, this quilt is going to be the death of me. Today was that day, that quilt top.
To start, the quilt top wasn’t square. The top measured 57 inches; the bottom measured 53 ¼ inches. Also, the backing didn’t have the required 4 inches all the way around. This is a repeat customer who is eagerly spreading the word about my business. I knew going into it that she had several quilts she was going to quilt herself on her domestic machine, but then she found me and decided to send them out for longarming. That means the backings are not super large. No problem, I said to myself confidently. I did her first one with no issues; I scooched the quilt top up super close to the leaders and used pins instead of clamps to attach the side straps.
The second quilt top was a little trickier, and despite my best efforts, I had to remove the last strip of the jelly-roll style top to make the top fit on the backing and avoid sewing to my canvas leaders.
The third quilt, today’s top, was a different story. Neither the top nor the backing was square. The backing had very tight margins; in some areas, an inch at best, and the bottom was missing a big “chunk” in one corner. The customer doesn’t care what I do, and I had an idea on how I could fix this. From my stash, I sewed in a piece of fabric that closely matched the backing to replace the missing chunk. I attached extra fabric on all sides so I could attach the backing to the leaders and maximize the use of the quilt backing without sewing my leaders.
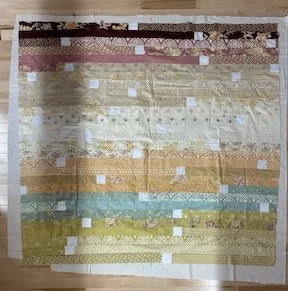
A challenging quilt top for a longarmer.
Where there’s a will, there’s a way.
I was able to load the backing, and it was relatively square. I opted to float the quilt top to allow me to adjust for it being out of square. With thread color picked, stitch design selected, and the computerization all set up, the stitching began.
First row, the machine throws a fit. Hmmm? Great, a quilting clip was sewn in between the batting and the quilt top. That’s a first for me, and I’m not sure how it happened. Thankfully, it was near the top edge, and I didn’t have much stitching to rip out. Unpicked some stitches, retrieved the clip, smoothed the fabric, and resumed stitching. The row finished, but I wasn’t super thrilled with the repaired area. The fabric “buckled” a bit in one area at the top. So, I unpicked and repaired again, but because I repaired a small spot in the middle of a row, I couldn’t figure out how to tell the machine to advance to the next row. It still thought I was in the middle of a repair. I called it a night.
During the night, I contemplated how best to center the machine for the next row. I tricked it by moving the machine to the very end and repairing again. It took two stitches to finish the row, and I successfully advanced to the next row. Yay me!
The next few rows went smoothly. Six inches remained to stitch on the quilt top, and I ran out of bobbin. Since I didn’t have any more bobbins wound in this color. I removed the spool of thread from the machine, leaving the thread in the thread path for easier rethreading. I wound a bobbin, tested the tension on the Towa gauge, repaired the pattern, and off I went… again. Three inches in and the machine threw a fit. Oops, I forgot to put the spool back on the machine and rethread. Because I “cheat” and leave the thread in the thread path, and pull new thread through, I’m not an expert at threading my machine. Sigh. I knew I had a picture somewhere showing how I thread my machine. I eventually found the photo and was able to zoom in to see how my machine is threaded. Sewing resumed, and a few stitches in, the top thread broke. At this point, I decided to test my tension, which I should have done in the first place, but with limited backing margin I opted not to. After two stitching tests and adjusting top and bottom tension, I resumed sewing.
Now, it’s the final row, a partial row, but remember that not-so-square, wonky bottom…. I was watching it stitch out, but a pleat still formed on one of the seams. I was sure my customer would not have cared. She’s not fussy and knew the bottom was wonky. But I cared. I picked out a few stitches and held the bottom while the machine stitched over that seam, and all was good.
This quilt top was finally quilted, and it looked great. I knew the customer would be thrilled.
But then I remembered that small area before I tested tension, and sure enough, when I checked those few inches, the stitching on the back was a complete mess; a bird’s nest - yes, that’s a technical sewing term. It might get cut off when the quilt is squared up and trimmed, but I decided to unpick those stitches. Because it was a previous row, I couldn’t easily use the machine to repair the pattern. Using a disappearing ink pen, I marked the stitching lines and free-motion quilted that spot. Not perfect, but not obvious and better than messy stitching.
Now the quilt is done. I trimmed the top and reminded the customer that she may want to square up the quilt top.
As I always say, “Every quilt has a story.”
Lessons Learned
Reconsider accepting longarm projects if the back isn’t big enough.
Focus on the task at hand. I admit, I was distracted by a bad case of poison ivy on my arms.
Always stitch-test your tension, especially if there’s been a complete rethread.
Educate quilters about why longarmers need backing fabric that is 8 inches larger than their quilt top.
Take a break when frustrated.
